LED "H4" running on 120 Volts AC
I bought a couple of cheapo Chinese LED "H4" lamps to use in a motorcycle recently. They were certainly cheap enough at $5 or so, but they didn't put out all that much light. I decided to make lemonade and make a 120V porch light out of one of them. I was tired of replacing the incandescent porch light. As it's on a photocell, you can't use a compact flourescent in that socket.
The "right" way to drop the 120VAC down to 12V is to use a transformer. If you like to live "on the edge", however, you can also use a capacitor to drop the voltage. The reactance of the cap means it will drop the voltage down but not dissipate much power as the current will be out of phase with the voltage. Hence the drop is efficient (i.e. no heat).
After the cap, I use a full wave bridge to change the AC to DC, and a small-ish cap across the DC output to give a little filtering (to cut down any possible flicker).
I experimentally tried various capacitors in series with the diode bridge AC input, all driven by a Variac ™ so I could slowly bring the voltage up to 120VAC and measure the output voltage to the LED bulb. I didn't want to just hook it right up to 120VAC in case I guessed the cap value wrong and let all the magic smoke out of the LEDs.
It turns out that for my "H4" bulb, which draws about 200mA at 12V, a 10uF cap is about right -- I get 11.6 VDC across the LED lamp. The cap has to be a high voltage AC cap -- not usually a common item. A motor starting cap turns out to be what's called for. One Ebay transaction later, I have an $8 10uF 400v motor starting cap.
This is about the limit for the amount of power you can deliver at 12V this way -- were you to try this with an incandescent H4 (35W/50W) you'd need a stupidly large/expensive capacitor. So if you want to replicate this, make sure your LED lamp doesn't draw much more than about 2.5W (12V @ 200mA) or the cap size/expense will get silly.
I removed the candelabra socket from the porch light fixture, drilled a few more holes, and tie-wrapped the cap and the H4 to the base plate. I glued some foil to the base plate to improve its reflectivity, and I glued a scrap plastic tube over the LEDs so that there couldn't be any chance contact between the LEDs and the base plate (or my fingers).
Safety Stuff
If you're not comfortable around electricity, house wiring, and voltages that can kill you, don't do this. If you don't know how to insulate connections, solder, or what "10uf 400v" means, don't do this. This circuit is NOT SAFE, in that EVERY PART of it is dangerous to touch when it's connected to live 120VAC. There is no transformer isolating the output from the line voltage, so don't connect anything except a battery powered (or passive) voltmeter to any part of the circuit. If you connect your AC-powered oscilloscope to this circuit, I can pretty much guarantee you that this will end in tears, or worse.
I'm purposely not supplying a schematic because if it's not intuitively obvious to you what the schematic for this looks like, then you should not be building this.
Addendum, 2011 12 09. If the LED lamp you're using is dimmable, then this entire circuit will be dimmable. Unfortunately, many LED lamps have complex driver circuitry that doesn't respond well to being driven by a dimmer. So beware of using this circuit with a dimmer.
William F. Dudley Jr.Dec 5, 2011
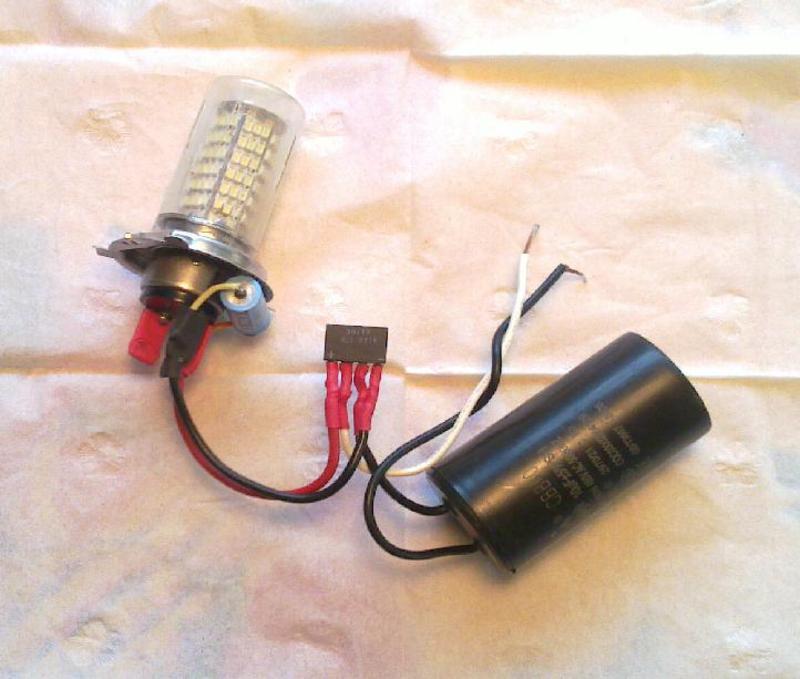
Assembled, sitting on the counter.
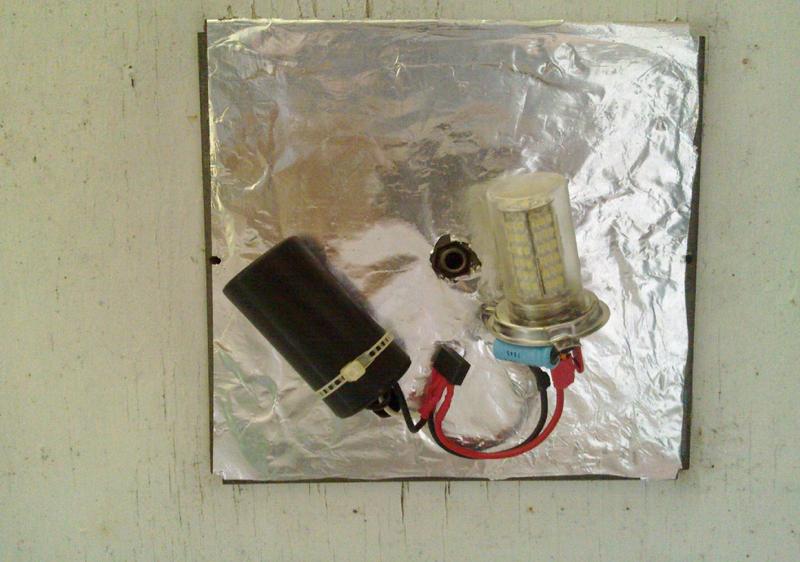
Attached to the porch light base plate.


 Views
Views